

A prong collar can be a great tool for improving the behavior of your canine companion, but only if you use it properly.”
To properly place a prong collar on your dog, attach the collar so that it fits snugly and the pointed ends of each link face inward toward the dog’s neck. Make sure there is enough room for one or two fingers to fit in between the collar and your dog’s neck.
I am going to share everything about how to place a prong collar on your dog to make sure that you are using it correctly and safely.
So let’s get started!
Step-by-step Guide on how to put a prong collar on a dog
Before getting into the step by step guide on placing a prong collar on a dog, it is important to measure your dog’s neck and get the right size of the prong collar for it.
Step 1: Begin by having treats ready in your hand:
When you put the prong collar on your pup, make sure to have some treats in your hand. The treats will help create a positive association with wearing the collar and will help your pup associate wearing the prong collar as a reward.
When your pup is first introduced to the prong collar, it can be a bit of a shock. Dogs are familiar with traditional collars and harnesses that don’t have the spikes or metal points found on the prong collar.
It’s important to introduce treats when you put the collar on so that your pup doesn’t associate the collar with pain or discomfort.
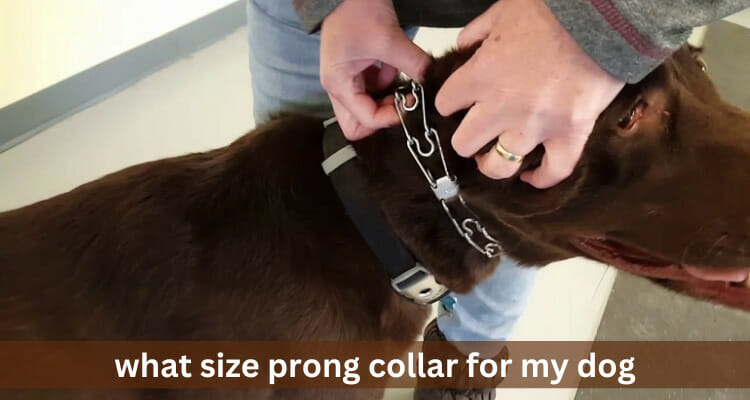
Step 2: Put the prong collar on your dog’s neck:
Once you have treats ready, it’s time to put the prong collar on your pup’s neck. Start by putting one end of the collar through the other end and then clasping it shut.
Make sure the prongs are facing inward towards your pup’s neck, away from their head. The collar should fit snugly but not too tight—you should be able to fit one or two fingers between the collar and your pup’s neck comfortably.
The prong collar should fit snugly, but not too tightly. If the collar is too tight it can be uncomfortable or even painful for your pup and could cause them to resist wearing it.
Making sure the prongs are facing inward towards your pup’s neck is important, too—if they face outward they can potentially poke or scratch your pup.
Step 3: Adjust the fit of the collar:
Once you’ve put the prong collar on your pup, take some time to adjust the fit. Make sure that the collar is snug but not too tight, and that the prongs are pointing inward towards your pup’s neck.
You should also make sure that the collar is not near any sensitive areas, such as the ears, eyes, or nose.
The fit of the prong collar is important—an ill-fitting collar can be uncomfortable or even painful for your pup. You also need to make sure that the collar isn’t near any sensitive areas, as it can potentially cause injury if it pokes or rubs against them.
Adjusting the fit before use is important to ensure your pup is as comfortable and safe as possible.
Step 4: Give treats to reward your pup:
Once you’ve adjusted the fit of the prong collar, give your pup a few treats so they associate wearing the collar with something positive. This will help them feel more comfortable wearing the collar, and will make it easier for them to accept it in the long run.
Giving treats after putting on a prong collar helps your pup associate wearing the collar with something positive. This will help them feel more comfortable when they’re wearing the collar, and will help them to be more accepting of it in the future.
Additionally, treats are a great way to reward your pup for their good behavior—it’s important to reinforce positive behaviors when training with a prong collar.
Once you’ve followed these steps, you can begin using the prong collar on your pup. With proper use, the prong collar can be a great way to help your pup learn and reinforce good behaviors.
How to measure your dog’s neck and get the right size of the prong collar:
Sure, here are the detailed steps for measuring your dog’s neck and getting the right size of a prong collar:
Step 1: Use a flexible tape measure
Firstly, you will need a flexible tape measure to measure your dog’s neck. A soft tape measure, such as the ones used for sewing, is ideal for this task. If you don’t have a flexible tape measure, you can use a piece of string and then measure the string with a ruler.
Step 2: Measure the circumference of your dog’s neck
Next, measure the circumference of your dog’s neck. Place the tape measure around the base of your dog’s neck, just behind the ears and under the jawline. Make sure the tape measure is snug but not too tight. Note down the measurement in inches or centimeters.
Step 3: Add 2 inches to the measurement
Once you have measured the circumference of your dog’s neck, add 2 inches to that measurement. This will give you the correct size of the prong collar you need. For example, if your dog’s neck measures 16 inches, then you should choose a prong collar that is 18 inches in length.
Step 4: Check the prong collar fit
Before using the prong collar, check the fit by putting it on your dog’s neck. The collar should be snug but not too tight. You should be able to fit two fingers between the prongs and your dog’s skin. If the collar is too loose, it will not be effective, and if it’s too tight, it can harm your dog.
It’s important to remember that prong collars should only be used under the guidance of a professional dog trainer, and should never be used as a substitute for proper training and positive reinforcement techniques.
Expert Tips on how to use the prong collar
The prong collar is an effective tool for training, but it’s important to use it correctly. Here are some expert tips on how to use the prong collar safely and effectively:
- Start by selecting the right size prong collar for your pup. The collar should fit snugly, but not too tightly, and the prongs should be facing inward towards your pup’s neck.
- Before using the prong collar, adjust it to fit your pup properly. Make sure that the collar is snug but not too tight, and that the prongs are pointing inward towards your pup’s neck. You should also make sure that the collar is not near any sensitive areas, such as the ears, eyes or nose.
- Once you’ve adjusted the collar for a good fit, give your pup a few treats so they associate wearing the collar with something positive. This will help them feel more comfortable wearing it and help them to be more accepting of it in the future.
- Be sure to monitor your pup closely while they are wearing the prong collar and remove it anytime they become uncomfortable or agitated.
- When training with a prong collar, use treats or verbal praise as rewards for good behavior.
This will help reinforce positive behaviors when used in combination with the prong collar.
Safety tips for using a prong collar
These are some safety tips to consider while using a prong collar:
1. Measure the collar properly before use:
It is important to select the right size of prong collar for your dog’s neck. Make sure the collar fits snugly and is not too tight or too loose.
2. Use a leash:
A prong collar should only be used with a leash, never alone. This will help you maintain control over your dog, making the experience safer for both of you.
3. Avoid jerking on the leash:
Pulling and jerking on the leash can cause your dog discomfort or even pain. Instead, pull gently and slowly to get the desired behavior from your dog.
4. Don’t leave it on too long:
Prong collars are meant to be used only for short training sessions. Do not leave them on all day or night as this could lead to neck discomfort or injury.
5. Monitor reactions:
During prong collar use, monitor how your dog is reacting and adjust accordingly if needed. If you notice any signs of distress, remove the collar immediately.
Following these safety tips when using a prong collar will help ensure a safe experience for you and your pup!
Conclusion
To sum up, placing a prong collar on a dog is relatively easy and straightforward, but it’s important to follow all the steps carefully. Start with measuring your dog’s neck to ensure you have the right size collar for them. Make sure that when you put the collar on, it is tight enough that two fingers can fit between their neck and the collar without slipping off. Finally, adjust the chain so that there are three links between its loop and the prongs – this will make sure your pup has enough slack to move comfortably but not too much to slip out of it. With these tips in mind, you should be able to properly place a prong collar on your dog safely and comfortably.
FAQs
How do I put a prong collar on my dog?
To put a prong collar on your dog, start by measuring their neck and finding the right size of collar. Then, loop the chain through the ring on the back of the collar and tighten so that it fits snugly – two fingers should fit between your pup’s neck and the collar. Finally, adjust the chain to make sure there are three links between the loop and the prongs.
Where should a prong collar sit on a dog’s neck?
A prong collar should sit high up on the dog’s neck, just behind their ears. Make sure it is tight enough that two fingers can fit between your pup’s neck and the collar without slipping off.
What is the proper placement of a prong collar?
The proper placement of a prong collar is high up on the dog’s neck, just behind their ears. Make sure it is tight enough that two fingers can fit between your pup’s neck and the collar without slipping off. The chain should also be adjusted so that there are three links between its loop and the prongs – this will make sure your pup has enough slack to move comfortably but not too much to slip out of it.
Where do you put a pinch collar on a dog?
A pinch collar should be placed high up on the dog’s neck, just behind their ears. Make sure it is tight enough that two fingers can fit between your pup’s neck and the collar without slipping off. The chain should also be adjusted so that there are three links between its loop and the prongs – this will make sure your pup has enough slack to move comfortably but not too much to slip out of it.